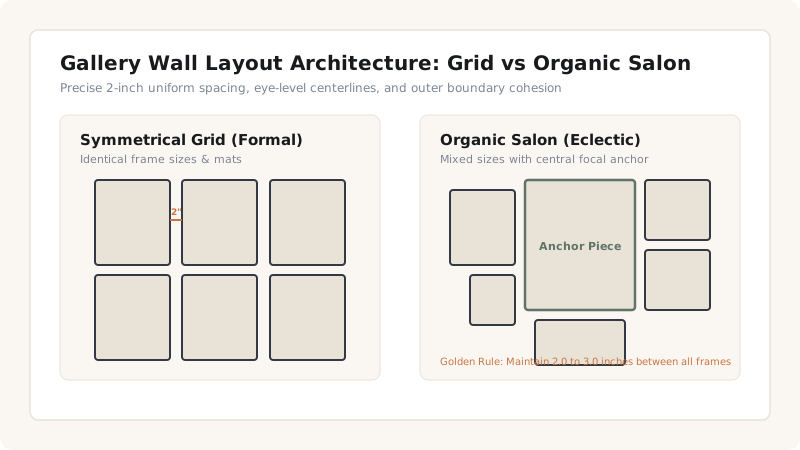
To build a flawless gallery wall, choose between a formal symmetrical grid (identical frames and wide mats) or an organic salon cluster (mixed frame sizes anchored around a central large piece). Maintain a strict 2.0 to 3.0 inch uniform spacing gap between all frames, and position the collective center of the cluster at 58 inches from the floor.
At a Glance: Key Takeaways
- Maintain a strict 2.0 to 3.0 inch spacing distance between every frame in the arrangement.
- Use kraft paper wall templates taped to the wall to test layout before hammering a single nail.
- Formal grid walls require identical frames, wide white mats, and level horizontal alignment.
- Organic salon walls start with one large anchor piece in the center, building outward asymmetrically.
1. The Two Core Gallery Layout Philosophies
Gallery walls transform blank drywall into rich personal narratives. The choice between formal grid and organic salon depends on the architectural tone of your room:
- The Formal Symmetrical Grid: 6, 8, or 9 identical frames with wide 3-inch archival white mats arranged in clean horizontal rows and vertical columns. Perfect for dining rooms, formal living rooms, and transitional hallways.
- The Organic Salon Cluster: Eclectic mix of frame finishes (warm oak, brass, matte black) and varied sizes. Built outward from a central focal 'anchor piece' while maintaining consistent 2-inch gaps between adjacent edges.
Gallery Wall Style Comparison
Use this reference table to calculate exact physical dimensions, ratios, and specifications before purchasing:
| Gallery Style | Frame Uniformity | Recommended Spacing | Setup Complexity | Best Room Context |
|---|---|---|---|---|
| Symmetrical Grid (6–9 Frames) | 100% Identical frames & mats | Strictly 2.0 inches | High (Laser level required) | Formal dining, modern living, hallways |
| Organic Salon (7–12 Frames) | Mixed frames with shared tone | 2.0 to 3.0 inches | Medium (Paper template method) | Stairwells, eclectic dens, home offices |
| Linear Picture Ledge Shelf | Varied frame sizes on 2 ledges | Overlapping frames | Easy (Level 2 shelves) | Rentals, bedrooms, kids playrooms |
| Triptych (3 Large Frames) | 3 Identical vertical frames | 3.0 to 4.0 inches | Low-Medium | Above living room sofa or king bed |
Gallery Wall Constraints
Every successful decoration project must account for physical and environmental constraints:
Frame Drifting and Tilting
Single-nail hangers shift every time doors slam. Use dual corner picture hooks or place 3M Command picture tabs on the bottom corners of each frame to lock alignment permanently.
Irregular Frame Spacing
Varying gaps (e.g., 2 inches in one spot, 5 inches in another) looks messy and disorganized; use a 2-inch wooden spacer block during installation.
Clashing Frame Styles
Limit frame finishes to a maximum of 2 complementary materials (e.g., natural oak and matte black) to preserve visual cohesion.
How to Build a Gallery Wall Using the Kraft Paper Method
Execute this professional sequence to achieve flawless results without backtracking:
Trace and Cut Paper Templates
Trace all picture frames onto kraft paper, cut out templates, and mark the exact hanging wire/hook position on each paper.
Arrange Templates on the Floor
Experiment with layouts on the floor until the balance feels cohesive with uniform 2-inch gaps.
Tape Templates to the Wall with Blue Tape
Transfer paper templates to the wall, checking level alignment and verifying the 58-inch center point.
Hammer Picture Hooks Directly Through Paper
Nail hooks into the marked hanging points through the paper templates.
Tear Down Paper and Hang Frames
Remove paper templates, hang frames, and lock bottom corners with adhesive tabs.
Common Mistakes & Countermeasures
Avoid these costly errors that compromise aesthetics, ergonomics, and budget:
Starting to Hammer Nails Without a Paper Plan
Project Execution Checklist
Track your physical progress. Checkboxes persist automatically on this device:
Frequently Asked Questions
How far apart should frames be on a gallery wall?
Maintain a strict 2.0 to 3.0 inches (5 to 7.5 cm) between all frame edges. Spacing wider than 4 inches makes the frames feel disconnected rather than a single unified collection.
What size frames work best for a 6-piece grid gallery wall?
Six 16x20 inch frames (with mats for 8x10 inch photos) arranged in two rows of three creates an elegant 54-inch wide by 42-inch high installation ideal for living room sofas.