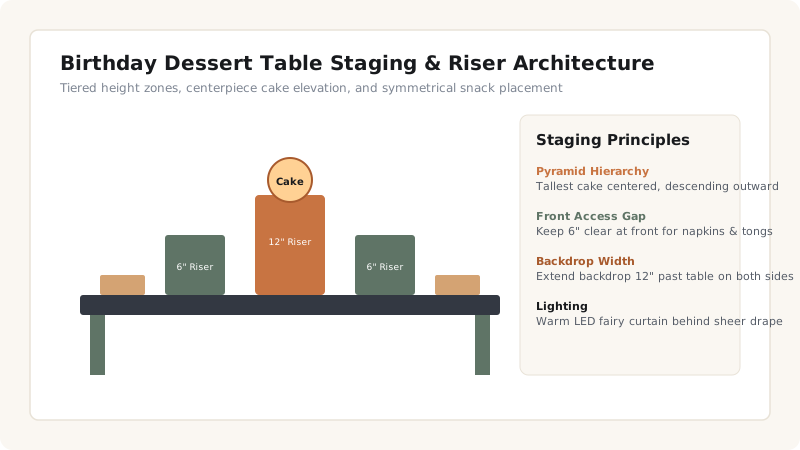
To stage a birthday dessert table like a professional, position the centerpiece cake on a 10–12" pedestal at the exact geometric center. Flank the cake with matching 6–8" medium risers for cupcakes, place flat platters along the front edge, and leave a 6" front clearance for guest reach and tongs.
At a Glance: Key Takeaways
- Follow the 'Pyramid Rule': tallest centerpiece cake in the center, descending to flat platters at the front.
- Maintain strict left-to-right symmetry with matching platters and candy jars.
- Use floor-length tablecloths (dropping 1/2" above floor) to hide storage boxes underneath.
- Incorporate a battery-operated LED spotlight behind the backdrop for warm halo glow.
1. The Architectural Pyramid Hierarchy
A flat table filled with platters looks disorganized and fails on camera. Professional dessert table staging uses vertical height zoning:
- Zone 1: The Apex Centerpiece (10–14" Height): The birthday cake rests on the highest central pedestal, aligned precisely with the center of the backdrop banner.
- Zone 2: Flanking Mid-Tiers (6–8" Height): Symmetrical cake stands, acrylic risers, or wooden crates displaying cupcakes, cake pops, and macarons.
- Zone 3: Front Touchdown Zone (0–2" Height): Flat ceramic platters, candy jars with scoops, and personalized cookie favors placed along the front 6 inches of table perimeter.
Dessert Table Proportions & Platter Guide
Use this reference table to calculate exact physical dimensions, ratios, and specifications before purchasing:
| Table Length | Cake Pedestal Height | Flanking Risers | Ideal Dessert Count | Backdrop Width |
|---|---|---|---|---|
| 4 ft Table (Compact) | 8–10" Pedestal | 2 Medium Risers (4–6") | 40–60 Individual Treats | 6 ft Wide Arch |
| 6 ft Table (Standard) | 10–12" Pedestal | 4 Medium Risers (6–8") | 80–120 Individual Treats | 7–8 ft Wide Arch |
| 8 ft Table (Grand) | 12–14" Pedestal | 6 Multi-Tier Risers | 150–200 Individual Treats | 10 ft Wide Wall |
Dessert Table Constraints
Every successful decoration project must account for physical and environmental constraints:
Buttercream Melting Under Sun/Heat
Buttercream and chocolate melt at temperatures above 72°F (22°C). Never place dessert tables in direct window sunlight or near outdoor heat sources; keep cake refrigerated until 30 minutes prior to photo time.
Table Sagging Under Heavy Cakes
Multi-tier fondant cakes weigh 20–40 lbs. Place heavy cake pedestals directly over table support legs rather than the flexing center of plastic folding tables.
Sticky Finger Hazards
Provide individual glassine treat bags, tongs, and cocktail napkins at both outer ends of the table.
How to Style a Birthday Dessert Table
Execute this professional sequence to achieve flawless results without backtracking:
Align Table with Backdrop Centerline
Center the 6-foot table with the backdrop arch, verifying straight sightlines from the main room entrance.
Drape Floor-Length Linen
Install an ironed floor-length tablecloth with matching textured runner down the middle.
Place Center Cake Pedestal
Set the 10-inch cake stand at the dead center, 8 inches from the rear table edge.
Position Symmetrical Risers
Place identical cupcake stands 14 inches to the left and right of the central cake.
Arrange Front Treat Platters
Lay flat cookie trays and favor boxes along the front edge, maintaining clean 2-inch gaps between dishes.
Common Mistakes & Countermeasures
Avoid these costly errors that compromise aesthetics, ergonomics, and budget:
Asymmetrical Clumping of Sweets
Project Execution Checklist
Track your physical progress. Checkboxes persist automatically on this device:
Frequently Asked Questions
What size tablecloth fits a standard 6-foot folding table?
A 90 x 132 inch rectangular tablecloth provides a perfect floor-length drop on all four sides of a standard 6 ft (30 x 72 inch) table.
How many desserts should you calculate per guest?
Calculate 3 to 4 mini dessert pieces per guest in addition to the main birthday cake slice.